电子工程师技术服务社区
公告
登录
|
注册
首页
技术问答
厂商活动
正点原子
板卡试用
资源库
下载
文章
社区首页
文章
在Ubuntu 16.04 LTS服务器上安装FreeRADIUS和Daloradius的方法
分 享
扫描二维码分享
在Ubuntu 16.04 LTS服务器上安装FreeRADIUS和Daloradius的方法
linux
radius
一口Linux
关注
发布时间: 2021-06-11
丨
阅读: 536
FreeRADIUS 为AAA Radius Linux下开源解决方案,DaloRadius为图形化web管理工具。  freeradius一般用来进行账户认证管理,记账管理,常见的电信运营商的宽带账户,上网账户管理,记账,都是使用的radius服务器进行鉴权记账的。 常见的radius服务器种类不多,比较强大的当属开源的freeradius,世界上大部分的radius服务器都是基于freeradius开发而来的。 Freeradius包含一个radius服务器和radius-client,可以对支持radius协议的网络设备进行鉴权记账,常见的开源路由器操作系统:如Openwrt,DD-wrt等,都支持radius协议,对PPPOE,热点,VPN等服务器进行账户管理认证,记账。 freeradius功能十分强大,支持众多的数据库。 Freeradius操作稍显麻烦,内置diaup_admin简单web管理,需要更简单易用的管理功能可以使用第三方的管理程序对Freeradius进行账户管理,系统配置等。 很多刚入门的朋友,在搭建环境的时候都会遇到各种问题,本文详细介绍在Ubuntu 16.04 LTS服务器上安装FreeRADIUS和Daloradius的方法,为初学者省去很多麻烦。 ## 一、在安装之前建议将系统升级到最新版本,运行以下命令: ```bash 1 sudo apt‐get up<ickey>date 2 sudo apt‐get upgrade ``` 升级后重新启动系统: ```bash 1 sudo reboot ``` 系统启动后,在Ubuntu 16.04系统上开始安装FreeRADIUS和Daloradius。 ## 二、安装Apache Web Server和PHP Daloradius将要求在主机系统上安装php和Apache Web服务器。 ### 1、在Ubuntu上安装Apache,运行以下命令安装Apache Web服务器: ```bash 1 sudo apt‐get install apache2 ``` ### 2、要在Ubuntu 16.04上安装PHP,请运行以下命令: 若要安装PHP 7.3版本请参考在Ubuntu 18.04或CentOS 7系统上安装PHP7.3:点击下面的链接进入: https://ywnz.com/linuxjc/3782.html ```bash 1 sudo apt‐get install php libapache2‐mod‐php php‐gd php‐common php‐mail \ 2 php‐mail‐mime php‐mysql php‐pear php‐db php‐mbstring php‐xml php‐curl ``` ### 3、检查PHP版本以确保安装成功 ```bash 1 php ‐v ``` 会输出这样的类似版本信息 ```bash 1 PHP 7.0.33‐0ubuntu0.16.04.16 (cli) ( NTS ) 2 Copyright (c) 1997‐2017 The PHP Group 3 Zend Engine v3.0.0, Copyright (c) 1998‐2017 Zend Technologies 4 with Zend OPcache v7.0.33‐0ubuntu0.16.04.16, Copyright (c) 1999‐2017, by Zend Technologies ``` ## 三、安装MySQL并创建数据库 ### 1、接下来是安装mysql服务器或者MariaDB并为daloRADIUS创建一个数据库。 ```bash 1 安装MYSQL命令: 2 sudo apt ‐y install mysql‐server ``` 若安装过程中提示你要输入root的密码,请按要求输入密码,然后"确定"即可。我这里暂设是:123456 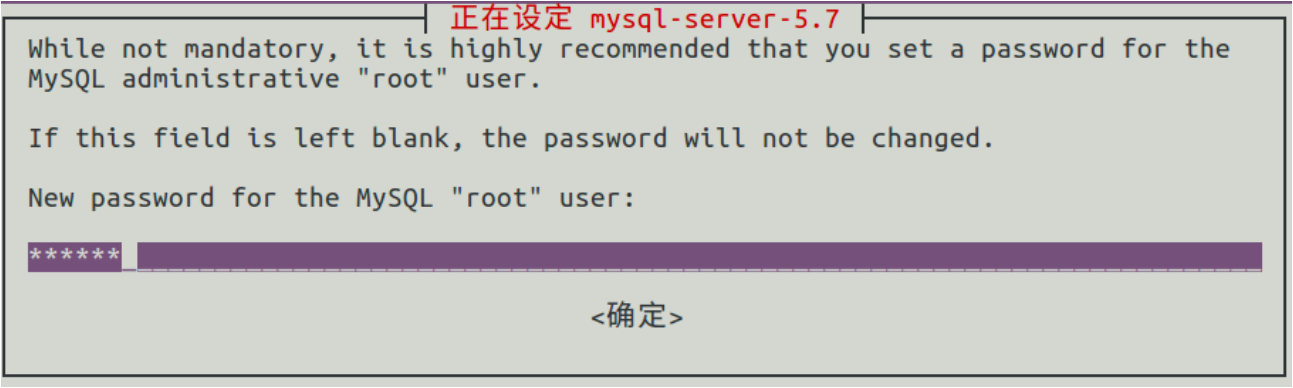 若没有提示输入密码的话请运行以下命令: ```bash 1 sudo mysql_secure_installation 2 如果您还没有设置密码,您将被要求设置密码,然后如果您想删除匿名用户,则禁止远程root 3 登录,删除测试数据库并重新加载表。除非你有其他的计划,并且知道你在做什么,否则我 4 建议你一直按Enter键。 ``` ### 2、安装并运行后,为FreeRADIUS创建一个数据库,这将在稍后阶段使用: 数据库名称:radius 数据库用户:radius 数据库用户密码:123456 ```bash 1 $ mysql ‐u root ‐p //进入mysql 2 MariaDB [(none)]> radius; //创建一个数据库用户 3 Query OK, 1 row affected (0.000 sec) 4 // 设置数据库用户密码 5 MariaDB [(none)]> GRANT ALL ON radius.* TO radius@localhost IDENTIFIED BY "123456"; 6 Query OK, 0 rows affected (0.000 sec) 7 MariaDB [(none)]> FLUSH PRIVILEGES; //刷新MySQL的系统权限相关表 8 Query OK, 0 rows affected (0.001 sec)9 MariaDB [(none)]> EXIT; //退出 10 Bye ``` ## 四、安装和配置FreeRADIUS ### 1、由于Ubuntu 16.04系统,版本2.x是官方存储库中提供的软件包,要安装3.0版,请为FreeRADIUS版本3添加PPA: ```bash 1 sudo add‐apt‐repository ppa:freeradius/stable‐3.0 2 sudo apt‐get to ‘yes’ to read radius clients from the database (‘nas’ table) 13 # Clients will ONLY be read on server startup. 14 read_clients = yes 15 16 # Table to keep radius client info 17 client_table = "nas" ``` ### 6、然后更改/etc/freeradius/mods-enabled/sql的组权限: ```bash 1 sudo chgrp ‐h freerad /etc/freeradius/mods‐available/sql 2 sudo chown ‐R freerad:freerad /etc/freeradius/mods‐enabled/sql ``` 重启freeradius服务: ```bash 1 sudo systemctl restart freeradius.service ``` 最后,我们将在调试模式下运行FreeRADIUS以确保一切正常工作。 ### 7、首先停止当前运行的服务 ```bash 1 sudo systemctl stop freeradius.service ``` 在调试模式下运行FreeRADIUS ```bash 1 sudo freeradius ‐X ``` 输出的末尾应该是这样的 ```bash 1 Listening on auth address * port 1812 bound to server default 2 Listening on acct address * port 1813 bound to server default 3 Listening on auth address :: port 1812 bound to server default 4 Listening on acct address :: port 1813 bound to server default 5 Listening on auth address 127.0.0.1 port 18120 bound to server inner‐tunnel 6 Listening on proxy address * port 55873 7 Listening on proxy address :: port 46059 8 Ready to process requests ``` 按Ctrl+C退出调试模式。 ### 8、重新启动FreeRADIUS服务。 ```bash 1 sudo systemctl start freeradius.service ``` ## 五、在Ubuntu 16.04上安装和配置Daloradius ### 1、如果没有安装wget和unzip,则安装wget和unzip ```bash 1 sudo apt ‐y install wget unzip ``` 下载并解压daloRADIUS和cd到目标文件夹中,这个文件夹是daloRADIUS-master ```bash 1 wget https://github.com/lirantal/daloradius/archive/master.zip 2 unzip daloradius‐master.zip 3 mv daloradius‐master/ daloradius 4 cd daloradius 5 若无法下载,可用浏览器打开https://github.com/lirantal/daloradius/archive/master.zip下载 ``` ### 2、我们将用daloRADIUS模式填充FreeRADIUS使用的数据库。它是我们在前面的案例中创建的数据库radius。 ```bash 1 sudo mysql ‐u root ‐p radius < contrib/db/fr2‐mysql‐daloradius‐and‐freeradius.sql 2 sudo mysql ‐u root ‐p radius < contrib/db/mysql‐daloradius.sql ``` 从“daloradius”目录中退出,并将该文件夹移动到文档根目录中,并将其重命名为“daloradius” ```bash 1 cd .. 2 sudo mv daloradius /var/www/html/ ``` ### 3、将daloradius文件夹的所有者和组更改为www-data:www-data,这是运行Apache Web Server的所有者和组。 ```bash 1 sudo chown ‐R www‐data:www‐data /var/www/html/daloradius/ ``` ### 4、接下来,我们需要创建daloRADIUS配置文件。daloRADIUS提供了一个配置文件模板,名 为/var/www/html/daloradius/library/daloradius.conf.php。我们只复制样本。 ```bash 1 sudo cp /var/www/html/daloradius/library/daloradius.conf.php.sample ``` /var/www/html/daloradius/library/daloradius.conf.php将配置文件的权限更改为664 ```bash 1 sudo chmod 664 /var/www/html/daloradius/library/daloradius.conf.php ``` ### 5、接下来,我们将编辑daloRADIUS配置文件中的一些值,以便它连接到我们之前为FreeRADIUS创建的数据库。 ```bash 1 sudo vim /var/www/html/daloradius/library/daloradius.conf.php ``` 我们将更改以下值 ```bash 1 $configValues['CONFIG_DB_USER'] = 'root'; 2 $configValues['CONFIG_DB_PASS'] = ''; 3 $configValues['CONFIG_DB_NAME'] = 'radius'; ``` 下面是我如何根据前面创建的数据库名、用户和密码修改它们的。 ```bash 1 $configValues['CONFIG_DB_USER'] = 'radius'; 2 $configValues['CONFIG_DB_PASS'] = '123456'; 3 $configValues['CONFIG_DB_NAME'] = 'radius' ``` ### 6、最后重启daloRADIUS和Apache ```bash 1 sudo systemctl restart freeradius.service apache2 ``` ## 六、访问daloRADIUS 1、要访问daloRADIUS,请在浏览器中访问本机的IP或域名,然后是/daloRADIUS,例如https://your_server_ip/daloradius 除非您配置了SSL,否则请确保它是http://,并且浏览器不会将其更改为https://,,因为有时可能会发生这种情况。 这就是daloRADIUS的样子 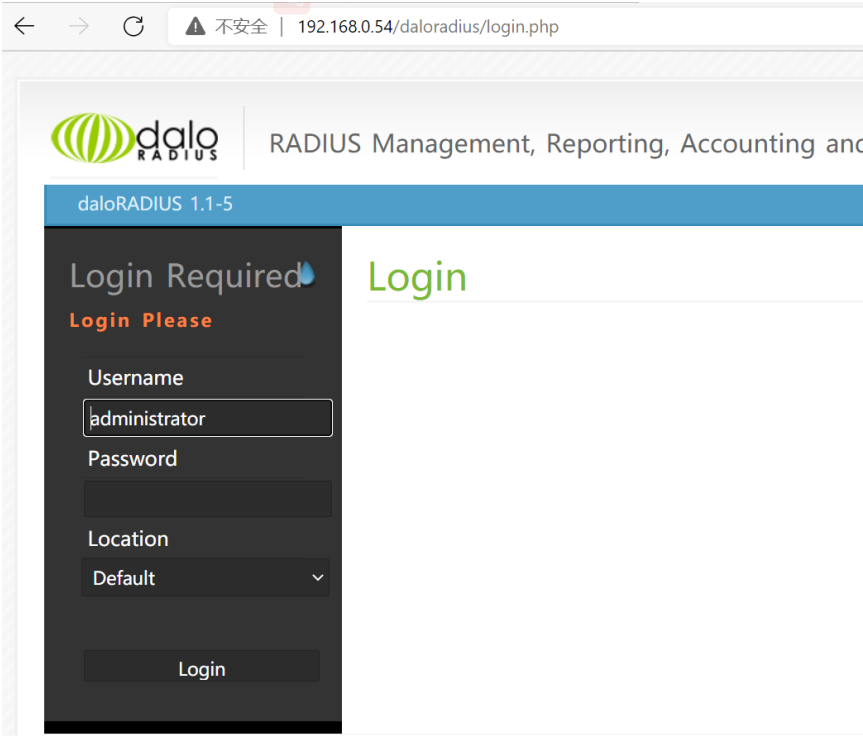 默认的登录凭据是: username: administrator password: radius ## 七、测试 FreeRADIUS和daloRADIUS ### 1、NAS (Network Access Server)客户端表充当了到受保护资源的网关。为了让另一个设备连接到我们的FreeRADIUS服务器,需 要将它添加到NAS客户端表中。 我们通过登录到daloRADIUS仪表板来添加NAS客户端表。然后导航到Management > NAS(在蓝色的子菜单中)> New NAS(在左边,深灰色的边栏)。 我们需要填写的最小选项如下所示 ```bash 1 NAS IP/Host:你将连接的计算机的IP。 2 NAS Secret:密钥。 3 NAS Type:你可以在这里任意填写 4 NAS Shortname:方便您使用的短名称 ``` 我将填写以下内容 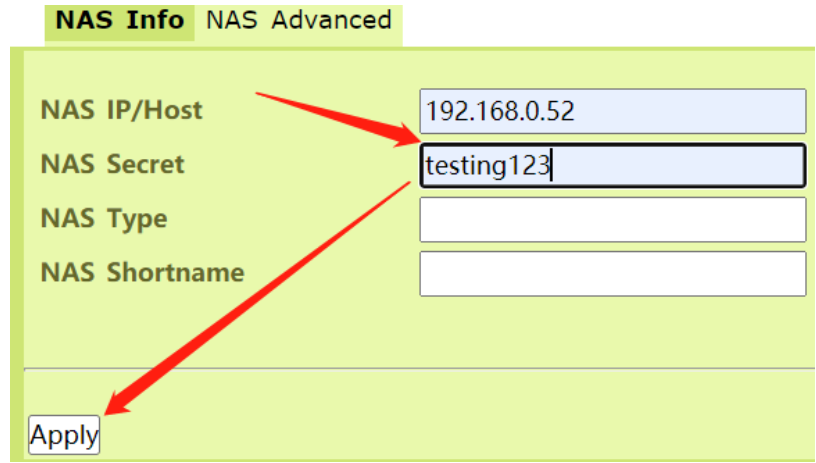 ### 2、创建daloRADIUS用户 为了测试我们的服务器,我们还需要一个用户。 通过在顶部菜单导航到Management > Users(在蓝色子菜单中)> New User(在左边,深灰色的边栏)。 对于我们的示例,我将使用以下凭证创建用户 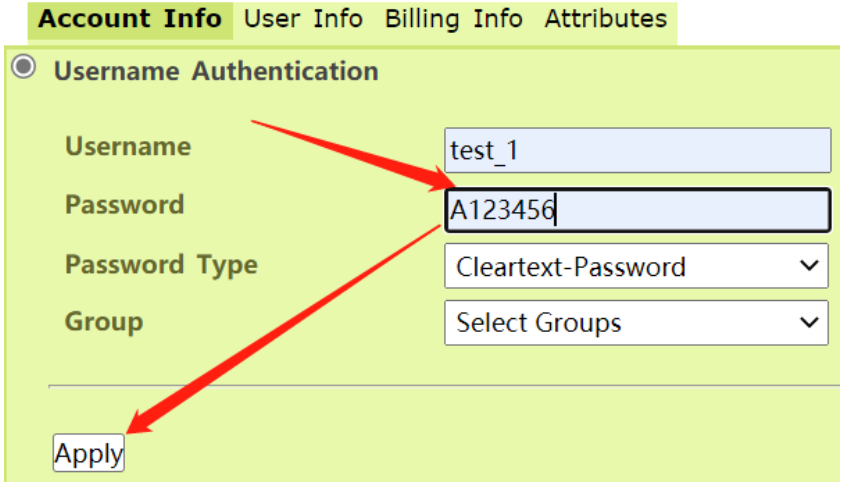 在创建用户时,除了Username,Password外,还有其他字段可用,但对于我们的目的,这些就足够了。 ### 3、在调试模式下运行FreeRADIUS 接下来,我们将在调试模式下运行FreeRADIUS,这样我们就可以看到当我们向它发送认证请求时会发生什么。 首先停止正在运行的进程。 ```bash 1 sudo systemctl stop freeradius.service ``` 在调试模式下运行FreeRADIUS ```bash 1 sudo freeradius ‐X ``` 注意:每次添加新的NAS表时,都需要重新启动FreeRADIUS服务器,以便它获取更新后的表。 ### 4、使用NTRadPing测试FreeRADIUS服务器 测试服务器的一个方便方法是使用一种叫做NTRadPing的免费Windows软件。 你可以在这里下载https://community.microfocus.com/t5/OES-Tips-Information/NTRadPing-1-5-RADIUS-TestUtility/ta-p/1777768 这是到档案的直接链接 https://community.microfocus.com/dcvta86296/attachments/dcvta86296/OES_Tips/148/1/ntradping.zip 这是VirusTotal的报告,所以你知道它是安全的 https://www.virustotal.com/gui/file/e1b3318b884e4643a043ec5e3104638016c343c447424c244fc1da4f6e7165ec/detection 只需解压归档文件并运行可执行文件以运行NTRadPing即可。 ### 5、我们将使用NTRadPing向在调试模式下运行FreeRADIUS的服务器发送身份验证请求。 我们将按如下方式填写 ```bash 1 RADIUS Server/port:FreeRADIUS服务器的IP /端口1812 2 Reply timeout (sec.):1 3 Retries: 1 4 RADIUS Secret Key:testing1235 User‐Name:test_1 6 Password:A123456 7 选中CHAP复选框,这样请求使用CHAP密码,而不是PAP密码。 8 现在单击Send按钮发送身份验证请求。 9 如果您接收到Access‐Accept响应,那么我们可以假定它可以工作。 ``` NTRadPing的输出应该像这样 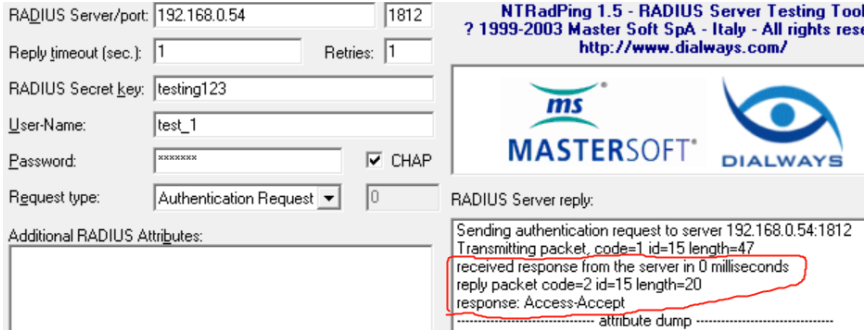 在调试模式下运行FreeRADIUS的终端中,输出应该以这样的内容结束 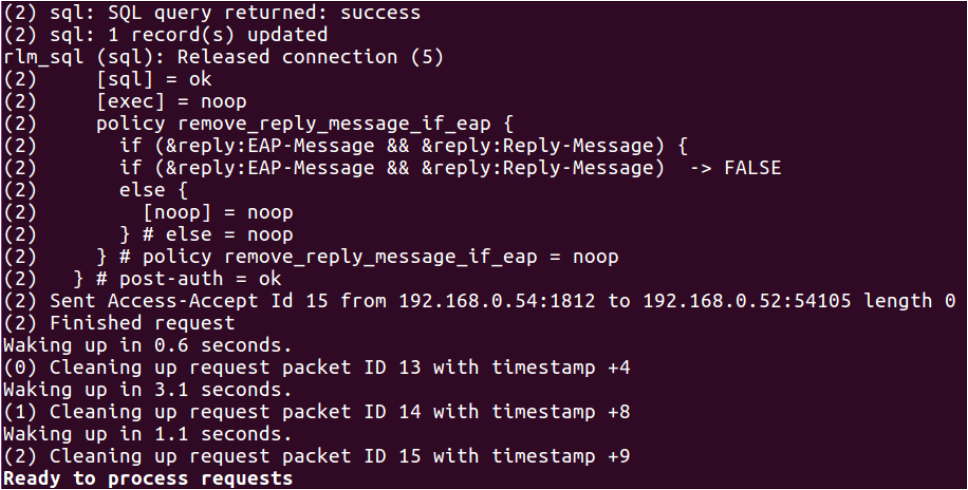 希望您也已经成功地在ubuntu16.0.4上安装了FreeRADIUS,并安装和配置了daloRADIUS,然后成功地测试了FreeRADIUS服 务器。 ## 八、常见错误 Failed binding with auth address [ ] when running in debug mode ```bash 1 Failed binding to auth address * port 1812 bound to server default: Address already in use 2 /etc/freeradius/3.0/sites‐enabled/default[59]: Error binding to port for 0.0.0.0 port 1812 ``` 这个错误发生在你试图运行FreeRADIUS,但有另一个FreeRADIUS实例已经在运行,所以你需要运行下面的命令来停止它 ```bash 1 sudo systemctl stop freeradius.service ``` 快抓紧来操作吧!
原创作品,未经权利人授权禁止转载。详情见
转载须知
。
举报文章
点赞
(
0
)
一口Linux
关注
评论
(0)
登录后可评论,请
登录
或
注册
相关文章推荐
MK-米客方德推出工业级存储卡
Beetle ESP32 C3 蓝牙数据收发
Beetle ESP32 C3 wifi联网获取实时天气信息
开箱测评Beetle ESP32-C3 (RISC-V芯片)模块
正点原子数控电源DP100测评
DP100试用评测-----开箱+初体验
Beetle ESP32 C3环境搭建
【花雕体验】16 使用Beetle ESP32 C3控制8X32位WS2812硬屏之二
X
你的打赏是对原创作者最大的认可
请选择打赏IC币的数量,一经提交无法退回 !
100IC币
500IC币
1000IC币
自定义
IC币
确定
X
提交成功 ! 谢谢您的支持
返回
我要举报该内容理由
×
广告及垃圾信息
抄袭或未经授权
其它举报理由
请输入您举报的理由(50字以内)
取消
提交