电子工程师技术服务社区
公告
登录
|
注册
首页
技术问答
厂商活动
正点原子
板卡试用
资源库
下载
文章
社区首页
文章
Linux驱动小技巧 | 利用DRIVER_ATTR实现调用内核函数
分 享
扫描二维码分享
Linux驱动小技巧 | 利用DRIVER_ATTR实现调用内核函数
linux
驱动
一口Linux
关注
发布时间: 2022-01-27
丨
阅读: 543
## 1. 前言 很多朋友在调试驱动的时候,都会遇到这样一个场景: **修改一个参数,然后调用某个内核中的函数。** 比如将某个gpio的值拉高/拉低,修改某个寄存器的值等等。 如果每一个参数都通过字符设备的ioctl接口,增加对应的cmd,会比较麻烦, 研究内核的计算机大牛门怎么会容忍这种事发生, 于是设计出了`DRIVER_ATTR`这个宏,完美解决这个需求。 下面一口君通过一个简单的实例,给大家讲解如何使用`DRIVER_ATTR`。 ## 2. DRIVER_ATTR定义 该宏定义的文件如下: include/linux/device.h ```c struct driver_attribute { struct attribute attr; ssize_t (*show)(struct device_driver *driver, char *buf); ssize_t (*store)(struct device_driver *driver, const char *buf, size_t count); }; #define DRIVER_ATTR(_name, _mode, _show, _store) \ struct driver_attribute driver_attr_##_name = __ATTR(_name, _mode, _show, _store) ``` `__ATTR`定义于文件 include/linux/sysfs.h ```c #define __ATTR(_name, _mode, _show, _store) { \ .attr = {.name = __stringify(_name), .mode = _mode }, \ .show = _show, \ .store = _store, \ } ``` 说明 ```c _name:名称,也就是将在sys fs中生成的文件名称。 _mode:上述文件的访问权限,与普通文件相同,UGO的格式,最高权限0644,否则会报错。 _show:显示函数,cat该文件时,此函数被调用。 _store:写函数,echo内容到该文件时,此函数被调用。 ``` ## 3. 使用步骤 定义一个写操作的回调函数: ```c static ssize_t peng_test_store(struct device_driver *driver, const char *buf, size_t count) { //对参数进行检查 if(NULL == buf || count >255 || count == 0 || strnchr(buf, count, 0x20)) return -1; printk("buf:%s count:%d\n",buf,count); return count; } ``` 声明该函数与文件节点关系 ```c static DRIVER_ATTR(peng, 0644, NULL, peng_test_store); ``` 创建文件节点: ```c ret = driver_create_file(&(hello_driver.driver), &driver_attr_peng); if (ret < 0){ dev_err(&pdev->dev, "could not create sysfs files\n"); ret = -ENOENT; } ``` 这几个名字之间关系如下: 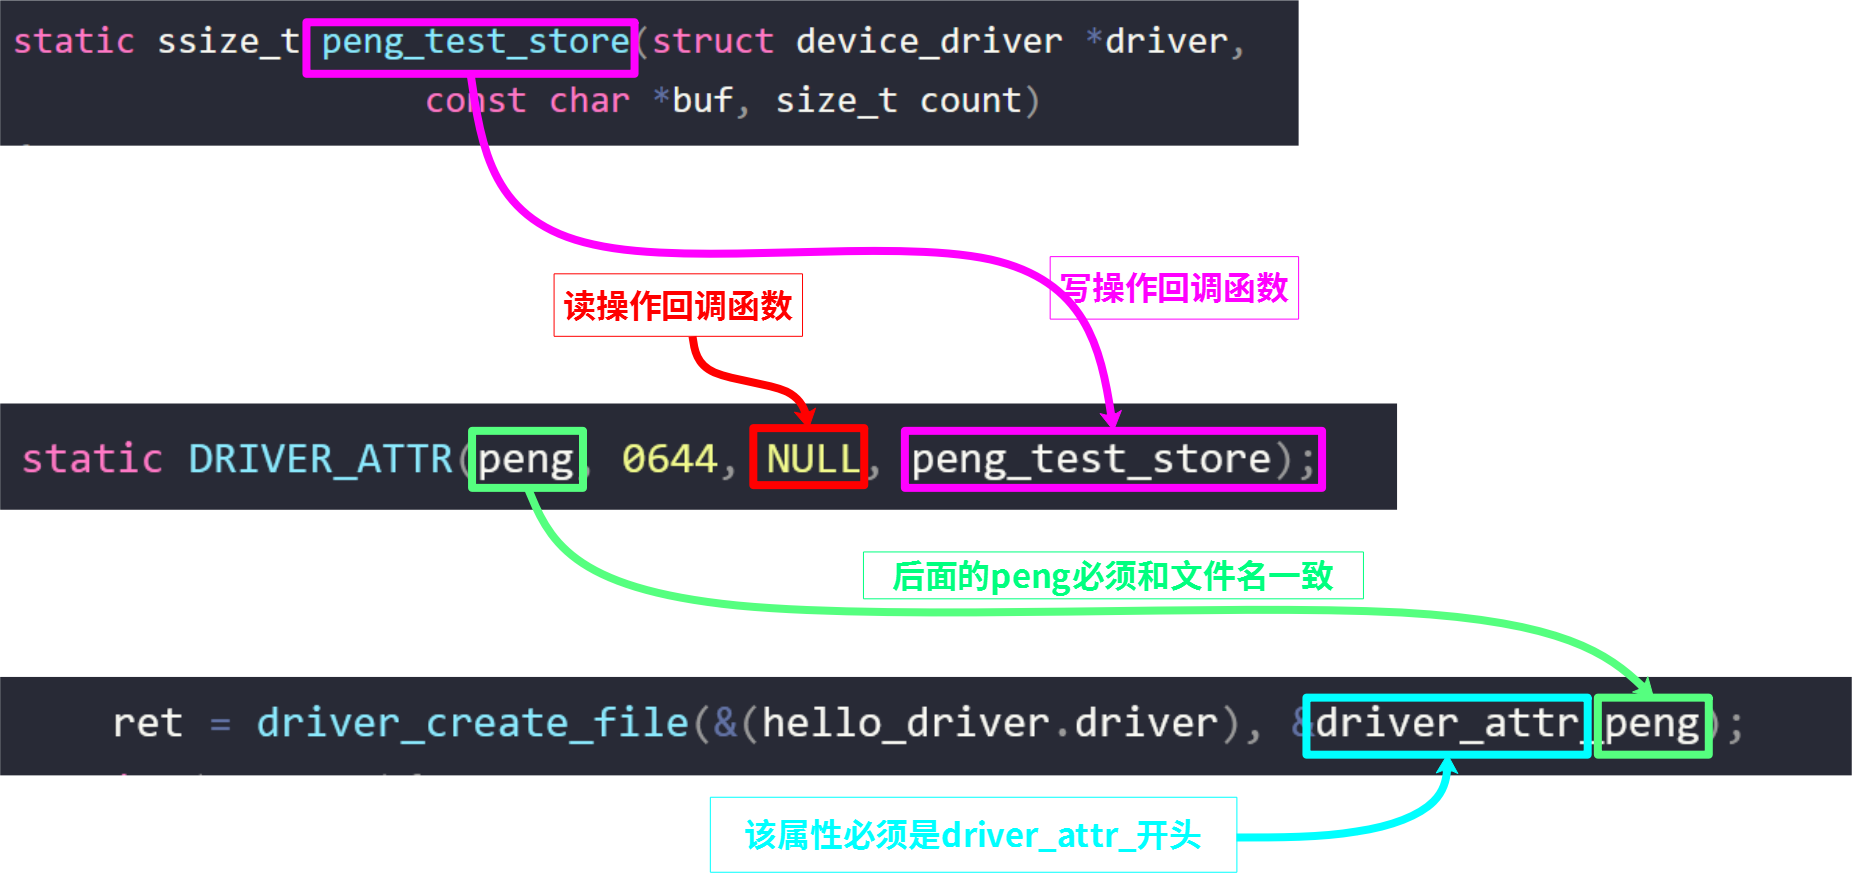 ## 4. 源码 本实验代码分为两个模块 device、driver, 分别定义结构体platform_device、platform_driver并注册到platform总线。 完整源码如下: device.c ```c #include <linux/init.h> #include <linux/module.h> #include <linux/platform_device.h> #include <linux/ioport.h> static void hello_release(struct device *dev) { return; } static struct platform_device hello_device = { .name = "duang", .id = -1, .dev.release = hello_release, }; static int hello_init(void) { printk("hello_init \n"); return platform_device_register(&hello_device); } static void hello_exit(void) { printk("hello_exit \n"); platform_device_unregister(&hello_device); return; } MODULE_LICENSE("GPL"); module_init(hello_init); module_exit(hello_exit); ``` driver.c ```c #include <linux/init.h> #include <linux/module.h> #include <linux/kdev_t.h> #include <linux/fs.h> #include <linux/cdev.h> #include <linux/device.h> #include <asm/io.h> #include <linux/platform_device.h> #include <linux/ioport.h> static int hello_probe(struct platform_device *pdev); static int hello_remove(struct platform_device *pdev); static ssize_t peng_test_store(struct device_driver *driver, const char *buf, size_t count) { if(NULL == buf || count >255 || count == 0 || strnchr(buf, count, 0x20)) return -1; printk("buf:%s count:%d\n",buf,count); return count; } static DRIVER_ATTR(peng, 0644, NULL, peng_test_store); static struct platform_driver hello_driver = { .probe = hello_probe, .driver.name = "duang", .remove = hello_remove, }; struct resource *res; static int hello_probe(struct platform_device *pdev) { int ret; printk("match ok \n"); ret = driver_create_file(&(hello_driver.driver), &driver_attr_peng); if (ret < 0){ dev_err(&pdev->dev, "could not create sysfs files\n"); ret = -ENOENT; } return 0; } static int hello_remove(struct platform_device *pdev) { printk("hello_remove \n"); return 0; } static int hello_init(void) { printk("hello_init \n"); return platform_driver_register(&hello_driver); } static void hello_exit(void) { printk("hello_exit \n"); platform_driver_unregister(&hello_driver); return; } MODULE_LICENSE("GPL"); module_init(hello_init); module_exit(hello_exit); ``` Makefile ```bash ifneq ($(KERNELRELEASE),) obj-m:=device.o driver.o else KDIR :=/lib/modules/$(shell uname -r)/build #KDIR :=/home/peng/linux-3.14 PWD :=$(shell pwd) all: make -C $(KDIR) M=$(PWD) modules clean: rm -f *.ko *.o *.mod.o *.symvers *.cmd *.mod.c *.order endif ``` ## 5. 编译运行 第一步:编译 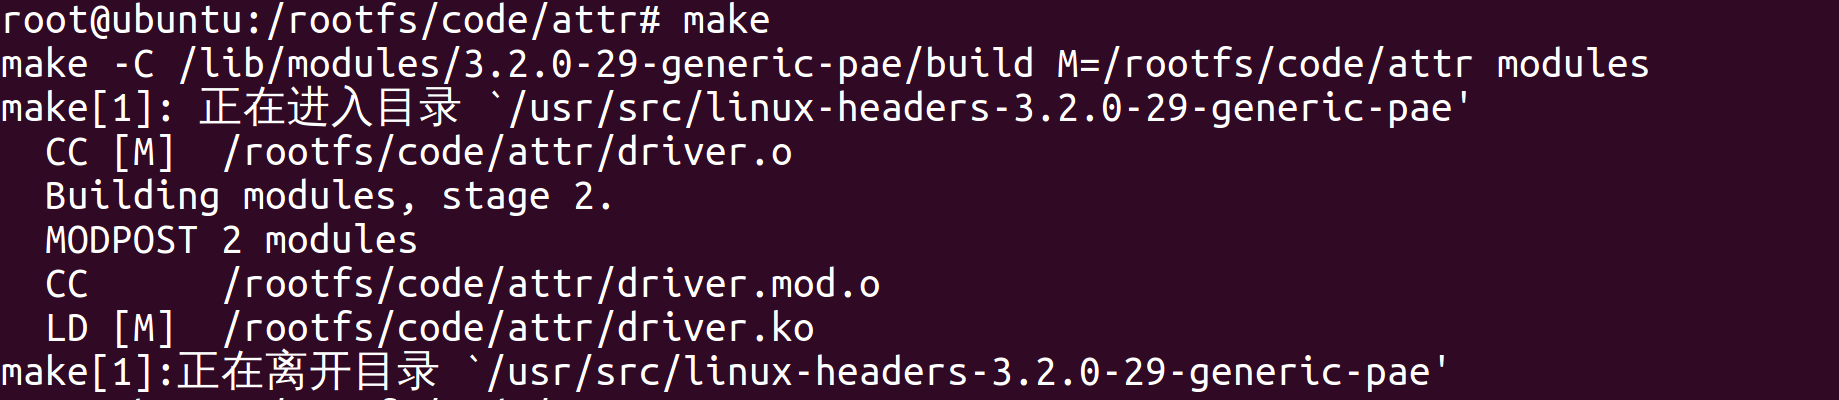 第二步:加载模块驱动 第三步:查看生成的文件节点:  第四步: 通过下面命令向节点输入一个数字(要管理员权限): ```bash echo 1 > peng ``` 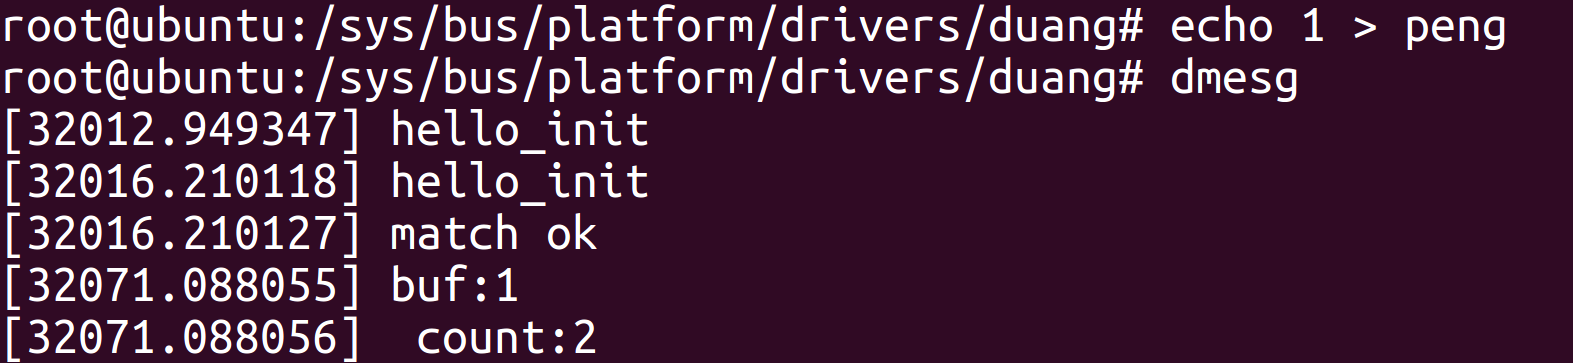由结果可知,我们通过向文件`peng`写入一个字符,实现了调用函数`peng_test_store()`,并且字符`1`传递给了参数`buf`,字符个数传递给了`count`。 其中目录`duang`是由结构体变量`hello_driver` 给出: ```c static struct platform_driver hello_driver = { .driver.name = "duang", }; ``` ## 6. 一次注册多个节点 需要借助结构体 ```c struct attribute ``` 以及函数 ```c /@@** * sysfs_create_group - given a directory kobject, create an attribute group * @kobj: The kobject to create the group on * @grp: The attribute group to create * * This function creates a group for the first time. It will explicitly * warn and error if any of the attribute files being created already exist. * * Returns 0 on success or error. */ int sysfs_create_group(struct kobject *kobj, const struct attribute_group *grp) ``` 此处就不验证了,直接从内核找个例子给大家学习下吧 ```bash drivers\input\touchscreen\ads7846.c ``` ```c static ssize_t ads7846_pen_down_show(struct device *dev, struct device_attribute *attr, char *buf) { struct ads7846 *ts = dev_get_drvdata(dev); return sprintf(buf, "%u\n", ts->pendown); } static DEVICE_ATTR(pen_down, S_IRUGO, ads7846_pen_down_show, NULL); static ssize_t ads7846_disable_show(struct device *dev, struct device_attribute *attr, char *buf) { struct ads7846 *ts = dev_get_drvdata(dev); return sprintf(buf, "%u\n", ts->disabled); } static ssize_t ads7846_disable_store(struct device *dev, struct device_attribute *attr, const char *buf, size_t count) { struct ads7846 *ts = dev_get_drvdata(dev); unsigned int i; int err; err = kstrtouint(buf, 10, &i); if (err) return err; if (i) ads7846_disable(ts); else ads7846_enable(ts); return count; } static DEVICE_ATTR(disable, 0664, ads7846_disable_show, ads7846_disable_store); static struct attribute *ads784x_attributes[] = { &dev_attr_pen_down.attr, &dev_attr_disable.attr, NULL, }; static struct attribute_group ads784x_attr_group = { .attrs = ads784x_attributes, }; ``` ```c err = sysfs_create_group(&mydevice->dev.kobj, &ads784x_attr_group); ``` ## 7. 补充 当然_ATTR不是独生子女,他还有一系列的姊妹__ATTR_RO宏只有读方法,__ATTR_NULL等等 ```bash 如对设备的使用 DEVICE_ATTR 对驱动使用 DRIVER_ATTR 对总线使用 BUS_ATTR 对类别 (class) 使用 CLASS_ATTR ``` 好了,大家后面在调试驱动的时候别忘了有这些宏可以使用。
原创作品,未经权利人授权禁止转载。详情见
转载须知
。
举报文章
点赞
(
0
)
一口Linux
关注
评论
(0)
登录后可评论,请
登录
或
注册
相关文章推荐
MK-米客方德推出工业级存储卡
Beetle ESP32 C3 蓝牙数据收发
Beetle ESP32 C3 wifi联网获取实时天气信息
开箱测评Beetle ESP32-C3 (RISC-V芯片)模块
正点原子数控电源DP100测评
DP100试用评测-----开箱+初体验
Beetle ESP32 C3环境搭建
【花雕体验】16 使用Beetle ESP32 C3控制8X32位WS2812硬屏之二
X
你的打赏是对原创作者最大的认可
请选择打赏IC币的数量,一经提交无法退回 !
100IC币
500IC币
1000IC币
自定义
IC币
确定
X
提交成功 ! 谢谢您的支持
返回
我要举报该内容理由
×
广告及垃圾信息
抄袭或未经授权
其它举报理由
请输入您举报的理由(50字以内)
取消
提交