电子工程师技术服务社区
公告
登录
|
注册
首页
技术问答
厂商活动
正点原子
板卡试用
资源库
下载
文章
社区首页
文章
Qt编程实例:基于Android的BLE通信软件
分 享
扫描二维码分享
Qt编程实例:基于Android的BLE通信软件
BLE
Qt
ANDROID
嵌入式从0到1
关注
发布时间: 2021-01-11
丨
阅读: 788
### 实现目标 自己编写基于Qt的Android软件,用于实现手机与TB-02-kit模块进行数据通讯。 Android软件发送的数据,经TB-02-kit模块转发至串口助手中输出; 串口助手发送的数据可以在Android软件中显示,进而实现BLE的数据双向通信。 ### 所需工具及环境 * TB-02-kit模块 * Qt Creator 4.10.1 * Qt 5.13.1 * XCOM V2.0 串口助手 * Android 手机 * 本人电脑 Windows 10 64bit [版本 10.0.19041.329] ### 前置知识 [**给大家介绍一款好用的蓝牙BT5.0透传模块**](https://mp.weixin.qq.com/s/eK83SjgAtM5Kl5QHYaNOFQ) [**Windows下基于Qt开发Android应用**](https://mp.weixin.qq.com/s/6FbgRDeBaFXUCnC4O3R_RA) [**BLE中这些概念你都了解吗**](https://mp.weixin.qq.com/s/eRGXErme1qhnUdoC8mi7Rw) ### 本文源码 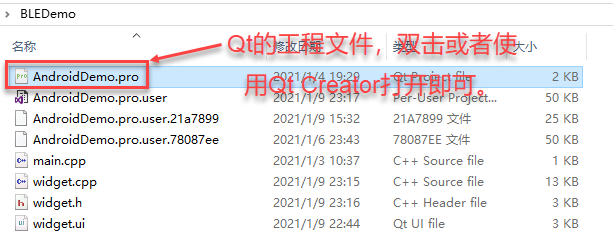 因为是第一次分享Qt代码,为了方便大家学习,代码添加了大量注释。 后台回复关键字“**Android-BLE**”,获取本文涉及到的软件及Qt工程源码。 ### 具体实现 #### 1. 要使用qt蓝牙模块, 项目的 .pro要声明使用   #### 2. 扫描设备 在构造函数中即执行蓝牙设备扫描,即软件一启动就执行扫描。 ```C Widget::Widget(QWidget *parent) : QWidget(parent) , ui(new Ui::Widget) { ui->setupUi(this); //创建搜索服务:https://doc.qt.io/qt-5/qbluetoothdevicediscoveryagent.html discoveryAgent =new QBluetoothDeviceDiscoveryAgent(this); //设置BLE的搜索时间 discoveryAgent->setLowEnergyDiscoveryTimeout(20000); connect(discoveryAgent,SIGNAL(deviceDiscovered(QBluetoothDeviceInfo)),this,SLOT(addBlueToothDevicesToList(QBluetoothDeviceInfo)));//找到设备之后添加到列表显示出来 connect(discoveryAgent, SIGNAL(finished()), this, SLOT(scanFinished())); connect(discoveryAgent, SIGNAL(canceled()), this, SLOT(scanCanceled())); connect(this, SIGNAL(returnAddress(QBluetoothDeviceInfo)), this, SLOT(createCtl(QBluetoothDeviceInfo))); //开始进行设备搜索 discoveryAgent->start(QBluetoothDeviceDiscoveryAgent::LowEnergyMethod); } ``` #### 3. 将扫描结果添加到QListWidget中 ```C //deviceDiscovered signals 对应的槽函数 void Widget::addBlueToothDevicesToList(const QBluetoothDeviceInfo &info) { if (info.coreConfigurations() & QBluetoothDeviceInfo::LowEnergyCoreConfiguration) //获取设备信息,并判断该设备是否为BLE设备 { //格式化设备地址和设备名称 QString label = QString("%1 %2").arg(info.address().toString()).arg(info.name()); //检查设备是否已存在,避免重复添加 QList<QListWidgetItem *> items = ui->ctrBleList->findItems(label, Qt::MatchExactly); //不存在则添加至设备列表 if (items.empty()) { QListWidgetItem *item = new QListWidgetItem(label); ui->ctrBleList->addItem(item); devicesList.append(info); } } } ``` #### 4. 连接蓝牙,停止扫描 ```C void Widget::on_btnConnectBle_clicked() { //确认选取了某一个蓝牙设备 if(!ui->ctrBleList->currentItem()->text().isEmpty()) { //获取选择的地址 QString bltAddress = ui->ctrBleList->currentItem()->text().left(17); for (int i = 0; i<devicesList.count(); i++) { //地址对比 if(devicesList.at(i).address().toString().left(17) == bltAddress) { QBluetoothDeviceInfo choosenDevice = devicesList.at(i); //发送自定义signals==>执行slots:createCtl emit returnAddress(choosenDevice); //停止搜索服务 discoveryAgent->stop(); break; } } } } ``` #### 5. 获取特征 ```C void Widget::searchCharacteristic() { if(m_bleServer) { QList<QLowEnergyCharacteristic> list=m_bleServer->characteristics(); qDebug()<<"[xiaohage]list.count()="<<list.count(); //遍历characteristics for(int i=0;i<list.count();i++) { QLowEnergyCharacteristic c=list.at(i); /@@*如果QLowEnergyCharacteristic对象有效,则返回true,否则返回false*/ if(c.isValid()) { //返回特征的属性。 //这些属性定义了特征的访问权限。 if(c.properties() & QLowEnergyCharacteristic::WriteNoResponse || c.properties() & QLowEnergyCharacteristic::Write) { ui->ctrSystemLogInfo->insertPlainText("\n具有写权限!"); m_writeCharacteristic = c; //保存写权限特性 if(c.properties() & QLowEnergyCharacteristic::WriteNoResponse) { m_writeMode = QLowEnergyService::WriteWithoutResponse; } else { m_writeMode = QLowEnergyService::WriteWithResponse; } } if(c.properties() & QLowEnergyCharacteristic::Read) { m_readCharacteristic = c; //保存读权限特性 } //描述符定义特征如何由特定客户端配置。 m_notificationDesc = c.descriptor(QBluetoothUuid::ClientCharacteristicConfiguration); //值为真 if(m_notificationDesc.isValid()) { //写描述符 m_bleServer->writeDescriptor(m_notificationDesc, QByteArray::fromHex("0100")); ui->ctrSystemLogInfo->insertPlainText("\n写描述符!"); } } } } } ``` #### 6. 发送数据 writeCharacteristic()方法,发送数据给ble设备。 点击界面中的"**发送**"按钮,发送"**Hello World**"字符串。 ```C void Widget::SendMsg(QString text) { QByteArray array=text.toLocal8Bit(); m_bleServer->writeCharacteristic(m_writeCharacteristic,array, m_writeMode); } void Widget::on_btnSendData_clicked() { SendMsg("Hello World"); } ``` #### 7. 写入数据 通过蓝牙QLowEnergyService::characteristicRead的回调接口,接收蓝牙收的消息。 ``` void Widget::BleServiceCharacteristicRead(const QLowEnergyCharacteristic &c,const QByteArray &value) { Q_UNUSED(c) ui->ctrSystemLogInfo->insertPlainText("\n当特征读取请求成功返回其值时:"); ui->ctrSystemLogInfo->insertPlainText(QString(value)); } ``` #### 8. 断开连接 ```C Widget::~Widget() { if(!(m_BLEController->state() == QLowEnergyController::UnconnectedState)) m_BLEController->disconnectFromDevice();//从设备断开链接 delete ui; } ``` ### 界面布局  ### 结果展示 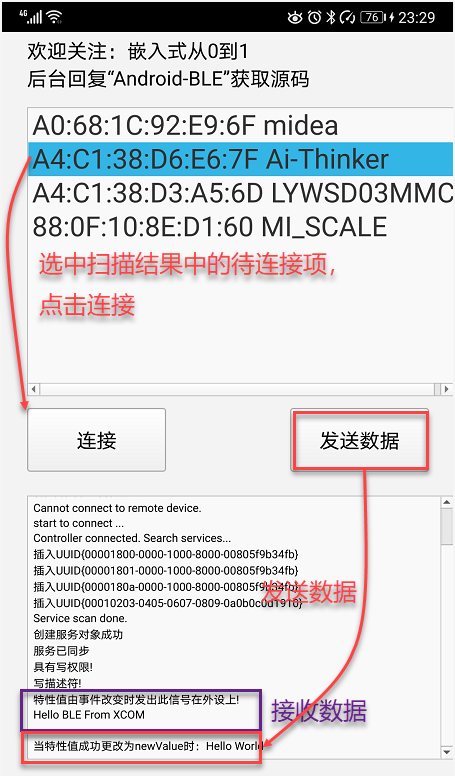 如果出现" **Cannot connect to remote device.** " ,可以点击"**连接**"按钮重新连接一下。 ### 串口助手及应用程序输出  ### To do 本实例只是演示一下Android手机与TB-02-kit模块的通讯过程,程序里有需要完善的地方,比如,应该增加一个"**扫描**"按钮,而不是软件启动过程中直接进行蓝牙扫描,这样的话,就需要蓝牙的上电要在软件启动之前完成。 程序的健壮性也要完善,比如偶尔会出现与模块无法正常连接的情况,需要再次点击"**连接**"按钮才可,这些工作你们自己可以完善一下哈。 有了本部分知识,下一步我们结合Android手机和TB-02-kit模块,实现STM32的设备的远程控制。 ### Qt小知识 #### 1. Qt Creator程序输出窗口过滤调试信息 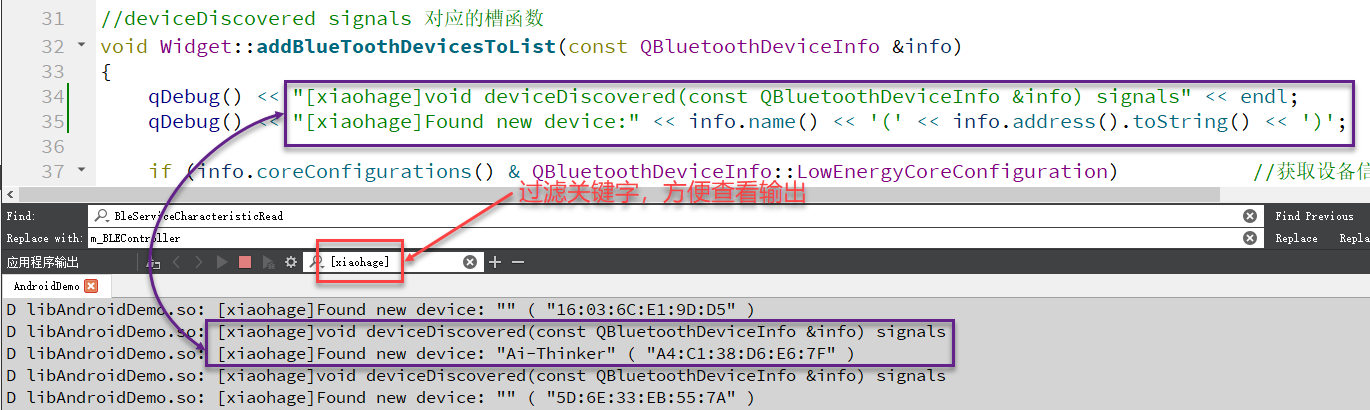 #### 2. 为Button添加事件 Button控件右键菜单中选中“转到槽...”,然后在弹出列表中选中信号:“**clicked()** ”,然后点击OK按钮,即可进入其事件函数中。 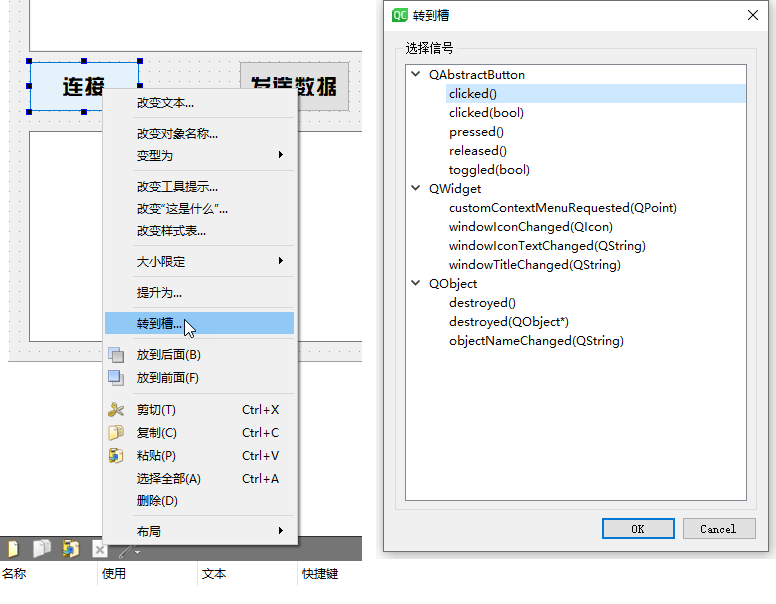 ### 参考资料 Qt官方文档:https://doc.qt.io/qt-5/classes.html ### 欢迎关注 程序员小哈带你玩转嵌入式,微信搜索:**嵌入式从0到1**,更多干货等着你。
原创作品,未经权利人授权禁止转载。详情见
转载须知
。
举报文章
点赞
(
0
)
嵌入式从0到1
关注
评论
(0)
登录后可评论,请
登录
或
注册
相关文章推荐
MK-米客方德推出工业级存储卡
Beetle ESP32 C3 蓝牙数据收发
Beetle ESP32 C3 wifi联网获取实时天气信息
开箱测评Beetle ESP32-C3 (RISC-V芯片)模块
正点原子数控电源DP100测评
DP100试用评测-----开箱+初体验
Beetle ESP32 C3环境搭建
【花雕体验】16 使用Beetle ESP32 C3控制8X32位WS2812硬屏之二
X
你的打赏是对原创作者最大的认可
请选择打赏IC币的数量,一经提交无法退回 !
100IC币
500IC币
1000IC币
自定义
IC币
确定
X
提交成功 ! 谢谢您的支持
返回
我要举报该内容理由
×
广告及垃圾信息
抄袭或未经授权
其它举报理由
请输入您举报的理由(50字以内)
取消
提交