电子工程师技术服务社区
公告
登录
|
注册
首页
技术问答
厂商活动
正点原子
板卡试用
资源库
下载
文章
社区首页
文章
用树莓派Zero W打造智能小车
分 享
扫描二维码分享
用树莓派Zero W打造智能小车
树莓派
智能车
4cee5a24e4caf23a
关注
发布时间: 2020-05-13
丨
阅读: 3176
当我购买了Raspberry Pi Zero W,我开始考虑怎么使用它。我选择把他当做那些在网上购买的标准机器人的大脑。 因此我购买了Arduino Smart Car套件,网上有很多有关此套件的信息,而且价格并不昂贵。 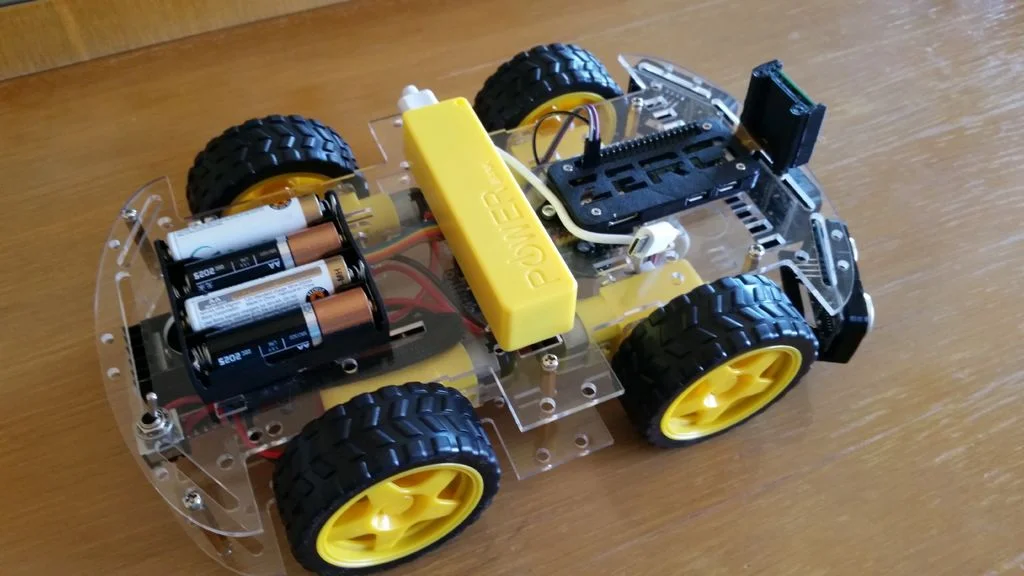 正如我所提到的,机器人的大脑是Raspberry Pi Zero W,如图像所示,我还将相机模块和3个SR04超声波距离传感器与它连接。 我现在不使用它们,但我认为将所有硬件都布置到位是个好主意,这样一来,当我最终想要使用它们时,就可以避免意外。 我选择使用两种不同的电池,一种用于电子设备,另一种用于电动机。这样可以确保在电机消耗电流时不会出现故障。 为了控制电机,我使用了一个16通道伺服驱动器,我认为这是我对该机器人做出的最佳决定。它简化了很多编码,并使其看起来更加整洁,因为许多电缆固定在较低的位置,而无需将它们连接到树莓派上。 使用python进行编程,以至于我很遗憾不久前未进行更改。我喜欢面向对象的编程,而python为我提供了OOP与硬件访问之间的完美结合。 我要解决的第一个任务是使该机器人可以进行远程控制。为此,我使用了Android手机的加速度计,并使用UDP协议将应用程序发送到IP地址和端口,并更改了加速度计(以及我当前未使用的其他内容)。 **步骤1:程式码结构**  我将代码分成了这些文件,我将一一解释: **·**aum2.py **·**l298NDrive.py **·**remoteControl.py **·**utils.py 在接下来的步骤中,我将一一解释这些文件 **步骤2:Aum2.py** 这是应用程序的主要入口点,并且包含robot class。 ```c import RPi.GPIO as GPIO from twisted.internet import reactor, task import l298NDrive import remoteControl import logging import utils logging.basicConfig(level=logging.WARN) log = logging.getLogger('Aum2') enableMotors = True # Motors can be disabled for testing with this runFrequency = 1 # The frequency on wich the main Task will be ran class Aum2(object): def __init__(self): log.debug("Initializing Aum2 robot...") # Configuration self.port = 5555 # Port to open so the remote can connect GPIO.setmode(GPIO.BOARD) # Configure min and max servo pulse lengths # Keep in mind these are not pins but servo outs self.motors = l298NDrive.L298NDrive(10, 11, 12, 13, 14, 15, enableMotors) self.rc = remoteControl.RemoteControl(self.port) def processRemoteCommand(self, cmd): (vr, vl) = utils.joystickToDiff(cmd.x, cmd.y, -9.8, 9.8, -4095, 4095) self.motors.setSpeeds(int(vr), int(-vl)) def run(self): print("running...") def start(self): self.rc.start(self.processRemoteCommand) l = task.LoopingCall(self.run) l.start(runFrequency) # run will be called with this frequency # Gather our code in a main() function def main(): robot = Aum2() robot.start() reactor.run() # Standard boilerplate to call the main() function to begin # the program. if __name__ == '__main__': main() ``` 我想对此文件发表几点意见: **·**我正在使用twisted library来协调来自UDP服务器的远程控制命令(我将在相应的源文件中显示该命令)和机器人的主要Run方法。如您所见,该方法现在什么也不做,但是其想法是在其中添加代码以使机器人更具自治性。 **·**该processRemoteCommand方法将每个我们从遥控器得到一个消息时被调用,所以我们应该采取相应的行动。 **·**该启动方法是我配置的两件需要进行协调的事情:监听远程命令,和机器人运行方法。 **步骤3:RemoteControl.py** 此文件包含两个类,即RemoteControl类和RCCommand类。 ```c import logging import traceback from twisted.internet.protocol import DatagramProtocol from twisted.internet import reactor import utils log = logging.getLogger('RemoteControl') class RemoteControl(DatagramProtocol): def __init__(self, port): self.port = port def start(self, onCommandReceived): log.debug("Initializing RemoteControl...") self.onCommandReceived = onCommandReceived reactor.listenUDP(self.port, self) def datagramReceived(self, data, addr): try: log.debug("Received %r from %s" % (data, addr)) command = RCCommand(data) self.onCommandReceived(command) except (KeyboardInterrupt, SystemExit): raise except: traceback.print_exc() class RCCommand(object): # Timestamp [sec], sensorid, x, y, z, sensorid, x, y, z, sensorid, x, y, z # 890.71558, 3, 0.076, 9.809, 0.565, ... def __init__(self, message): self.x = 0 self.y = 0 self.z = 0 self.values = message.split(",") if len(self.values) >= 5 and self.values[1].strip() == "3": self.x = -float(self.values[3].strip()) self.y = -float(self.values[2].strip()) self.z = float(self.values[4].strip()) log.debug("x={} y={} z={}".format(self.x, self.y, self.z)) else: log.warn("Invalid message: {}".format(message)) ``` 同样,RemoteControl类使用twisted library的框架来侦听运行Wireless IMU应用的Android手机发送的UDP包。该应用程序发送具有以下结构的消息: 890.71558,3,0.076,9.809,0.565,4,-0.559,0.032,-0.134,5,-21.660,-36.960,-28.140 我只对上面突出显示的消息部分感兴趣,即传感器ID 3和加速度计提供的三个测量值(0.076、9.809、0.565)。 如您在代码中所见,类RCCommand将此消息的有用部分转换为机器人所需的x和y值,其中: x是从前到后的轴 y从一边到另一边。 我也有z轴的代码,但是我暂时不使用它。 **步骤4:L298NDrive.py** 这是负责控制电动机的文件。为此,它将命令发送到伺服驱动器,该驱动器连接到L298N电动机驱动器。我想我可能会在我构建的每个Raspberry Pi机器人上重用该类。它真的很简单,可以满足需要,而不会使任何事情复杂化。 ```c import Adafruit_PCA9685 import logging import math import utils log = logging.getLogger('L298NDrive') class L298NDrive(object): def __init__(self, enA, in1, in2, in3, in4, enB, enabled): log.debug("Initializing L298Drive...") self.minPwm = 0 self.MaxPwm = 4095 self.enA = enA self.in1 = in1 self.in2 = in2 self.in3 = in3 self.in4 = in4 self.enB = enB self.enabled = enabled if enabled: self.enable() def enable(self): self.enabled = True # Initialise the PCA9685 using the default address (0x40). self.pwm = Adafruit_PCA9685.PCA9685() self.setSpeeds(0, 0) def disable(self): self.enabled = False self.setSpeeds(0, 0) # Initialise the PCA9685 using the default address (0x40). self.pwm = None def setSpeeds(self, rSpeed, lSpeed): self.setSpeed(1, rSpeed) self.setSpeed(2, lSpeed) def setSpeed(self, motor, speed): pwm = int(math.fabs(speed)) log.info("Motor: {} speed: {} pwm: {}".format(motor, speed, pwm)) if motor == 1: if speed >= 0: if self.enabled: self.pwm.set_pwm(self.in1, 0, 0) self.pwm.set_pwm(self.in2, 0, self.MaxPwm) else: if self.enabled: self.pwm.set_pwm(self.in1, 0, self.MaxPwm) self.pwm.set_pwm(self.in2, 0, 0) if self.enabled: self.pwm.set_pwm(self.enA, 0, pwm) else: # motor == 2 if speed >= 0: if self.enabled: self.pwm.set_pwm(self.in3, 0, 0) self.pwm.set_pwm(self.in4, 0, self.MaxPwm) else: if self.enabled: self.pwm.set_pwm(self.in3, 0, self.MaxPwm) self.pwm.set_pwm(self.in4, 0, 0) if self.enabled: self.pwm.set_pwm(self.enB, 0, pwm) ``` 可以看出,代码的主要部分是在setSpeed(self,motor,speed)方法中,该方法接收要配置的电动机编号(1=右,2=左),并告诉伺服驱动器如何处理与该电机关联的引脚。 也许应该给一些解释,以了解我在做什么。 该L298N电机驱动器使用6个管脚驱动两个马达: **·**enA用来告诉速度(使用PWM),我们要使电动机启动1。通电时,告诉驾驶员电动机1应该沿一个方向移动(in2应该关闭) **·**in2通电时,告诉驾驶员电动机1应当沿相反方向移动(in1应该关闭) **·**in3通电时,告诉驾驶员电动机2应当沿一个方向移动(in4应该处于关闭状态) **·**in4上电时,告知驾驶员电动机2应当沿相反方向移动(in4应该关闭) **·**enB用来告诉速度(使用PWM),我们希望电动机旋转 所以在我们的例子中,因为我对所有引脚都使用了伺服驱动器(只有其中两个需要PWM): 当我这样做时: ```c self.pwm.set_pwm(self.in1, 0, 0) ``` 我真的是在告诉伺服驱动器,在所有PWM期间,该引脚(in1)应该都处于OFF状态(所以我将该引脚设为OFF)。 当我这样做时: ```c self.pwm.set_pwm(self.in1, 0, self.MaxPwm) ``` 我真的是在告诉伺服驱动器,在所有PWM期间,该引脚(in1)应该都处于ON状态(因此我将该引脚设为ON) 然后,当我这样做时: ```c self.pwm.set_pwm(self.enA, 0, pwm) ``` 我使用真正的PWM引脚,并使用速度参数设置我所要求的脉冲。 **Step 5: Utils.py** 最后是这个文件,它不包含类,但是我认为我将在其他地方重用的所有有用功能。 ```c import math import logging log = logging.getLogger('utils') def map(v, in_min, in_max, out_min, out_max): # Check that the value is at least in_min if v < in_min: v = in_min # Check that the value is at most in_max if v > in_max: v = in_max return (v - in_min) * (out_max - out_min) // (in_max - in_min) + out_min def joystickToDiff(x, y, minJoystick, maxJoystick, minSpeed, maxSpeed): # If x and y are 0, then there is not much to calculate... if x == 0 and y == 0: return (0, 0) # First Compute the angle in deg # First hypotenuse z = math.sqrt(x * x + y * y) # angle in radians rad = math.acos(math.fabs(x) / z) # and in degrees angle = rad * 180 / math.pi # Now angle indicates the measure of turn # Along a straight line, with an angle o, the turn co-efficient is same # this applies for angles between 0-90, with angle 0 the coeff is -1 # with angle 45, the co-efficient is 0 and with angle 90, it is 1 tcoeff = -1 + (angle / 90) * 2 turn = tcoeff * math.fabs(math.fabs(y) - math.fabs(x)) turn = round(turn * 100, 0) / 100 # And max of y or x is the movement mov = max(math.fabs(y), math.fabs(x)) # First and third quadrant if (x >= 0 and y >= 0) or (x < 0 and y < 0): rawLeft = mov rawRight = turn else: rawRight = mov rawLeft = turn # Reverse polarity if y < 0: rawLeft = 0 - rawLeft rawRight = 0 - rawRight # minJoystick, maxJoystick, minSpeed, maxSpeed # Map the values onto the defined rang rightOut = map(rawRight, minJoystick, maxJoystick, minSpeed, maxSpeed) leftOut = map(rawLeft, minJoystick, maxJoystick, minSpeed, maxSpeed) log.debug("x={} y={}, rOut={}, lOut={}".format(x, y, rightOut, leftOut)) return (rightOut, leftOut) ``` 这里只有两种方法,第一种是来自Arduino的map函数端口。它将指定输入限制(in_min,in_max)内的值(v)转换为输出范围(out_min,out_max)内的相应值。此已转换为指定为参数的速度范围。 **步骤6:更多图片**   
原创作品,未经权利人授权禁止转载。详情见
转载须知
。
举报文章
点赞
(
0
)
4cee5a24e4caf23a
关注
评论
(0)
登录后可评论,请
登录
或
注册
相关文章推荐
MK-米客方德推出工业级存储卡
Beetle ESP32 C3 蓝牙数据收发
Beetle ESP32 C3 wifi联网获取实时天气信息
开箱测评Beetle ESP32-C3 (RISC-V芯片)模块
正点原子数控电源DP100测评
DP100试用评测-----开箱+初体验
Beetle ESP32 C3环境搭建
【花雕体验】16 使用Beetle ESP32 C3控制8X32位WS2812硬屏之二
X
你的打赏是对原创作者最大的认可
请选择打赏IC币的数量,一经提交无法退回 !
100IC币
500IC币
1000IC币
自定义
IC币
确定
X
提交成功 ! 谢谢您的支持
返回
我要举报该内容理由
×
广告及垃圾信息
抄袭或未经授权
其它举报理由
请输入您举报的理由(50字以内)
取消
提交