电子工程师技术服务社区
公告
登录
|
注册
首页
技术问答
厂商活动
正点原子
板卡试用
资源库
下载
文章
社区首页
文章
Linux命令cURL详解+定时上传文件到FTP服务器(送源码)
分 享
扫描二维码分享
Linux命令cURL详解+定时上传文件到FTP服务器(送源码)
linux
curl
一口Linux
关注
发布时间: 2021-03-30
丨
阅读: 556
# 前言 前段时间群里讨论,想实现某个文件定时上传到服务器要怎么来实现。我记得之前做过 一个项目:`为高通的iot模组编写FOTA功能`:实现模组可以远程下载升级镜像包,实现版本升级功能。并当时使用的一个超级强大的工具cURL。心血来潮,决定专门写一篇文章,送给需要的朋友。 文章分两部分 1. 首先介绍cURL的用法; 2. 实现一个定时上传日志文件的一个简单的程序。  # 概念 cURL 是常用的命令行工具,用来请求 Web 服务器。它的名字就是客户端(client)的 URL 工具的意思。 cURL 的原作者是 Daniel Stenberg (目前是 cURL 的核心开发者),同时也是 IETF HTTPbis 工作组的资深成员。Daniel 在 1998 年创建了 curl 项目,他编写了最初的 curl 版本,并创建了 libcurl 库。到目前为止,代码仓库包括的 24000 次 commit 有超过一半是 Daniel 本人提交的,他依然是项目的核心开发者。Daniel 表示已将 curl 视为自己的孩子。 作为一款强力工具,支持的协议包括 (DICT, FILE, FTP, FTPS, GOPHER, HTTP, HTTPS, IMAP, IMAPS, LDAP, LDAPS, POP3, POP3S, RTMP, RTSP, SCP, SFTP, SMTP, SMTPS, TELNET and TFTP),还支持POST、cookies、认证、从指定偏移处下载部分文件等功能,具有用户代理字符串、限速、文件大小、进度条、cookie支持、用户认证、断点续传等特征。 # 一、命令的安装 ```bash sudo apt-get install curl ``` # 二、cURL命令语法: ```bash curl [options] [URL...] ``` # 三、URL格式 URL的格式定义要参考 RFC 1808 。 ```bash 地址:http://www.w3.org/Addressing/rfc1808.txt 《Relative Uniform Resource Locators 》 ``` URL由三部分组成:资源类型、存放资源的主机域名、资源文件名。 也可认为由4部分组成:**`协议、主机、端口、路径`** URL的一般语法格式为: ```bash protocol :// hostname[:port] / path / [;parameters][?query]#fragment ``` (带方括号[]的为可选项)。 #### protocol(协议) 指定使用的传输协议,下表列出 protocol 属性的有效方案名称。 最常用的是HTTP协议,它也是WWW中应用最广的协议。 * file 资源是本地计算机上的文件。格式file:///,注意后边应是三个斜杠。 * ftp 通过 FTP访问资源。格式 FTP:// * gopher 通过 Gopher 协议访问该资源。 * http 通过 HTTP 访问该资源。 格式 HTTP:// * https 通过安全的 HTTPS 访问该资源。 格式 HTTPS:// * mailto 资源为电子邮件地址,通过 SMTP 访问。 格式 mailto: * MMS 通过 支持MMS(流媒体)协议的播放该资源。(代表软件:Windows Media Player)格式 MMS:// * ed2k 通过 支持ed2k(专用下载链接)协议的P2P软件访问该资源。(代表软件:电驴) 格式 ed2k:// * Flashget 通过 支持Flashget:(专用下载链接)协议的P2P软件访问该资源。(代表软件:快车) 格式 Flashget:// * thunder 通过 支持thunder(专用下载链接)协议的P2P软件访问该资源。(代表软件:迅雷) 格式 thunder:// * news 通过 NNTP 访问该资源。 #### hostname(主机名) 是指存放资源的服务器的域名系统(DNS) 主机名或 IP 地址。有时,在主机名前也可以包含连接到服务器所需的用户名和密码(格式:username:password@hostname)。 #### port(端口号) 整数,可选,省略时使用方案的默认端口,各种传输协议都有默认的端口号,如http的默认端口为80。如果输入时省略,则使用默认端口号。有时候出于安全或其他考虑,可以在服务器上对端口进行重定义,即采用非标准端口号,此时,URL中就不能省略端口号这一项。 #### path(路径) 由零或多个“/”符号隔开的字符串,一般用来表示主机上的一个目录或文件地址。 #### parameters(参数) 这是用于指定特殊参数的可选项。 #### query(查询) 可选,用于给动态网页(如使用CGI、ISAPI、PHP/JSP/ASP/ASP.NET等技术制作的网页)传递参数,可有多个参数,用“&”符号隔开,每个参数的名和值用“=”符号隔开。 #### fragment(信息片断) 字符串,用于指定网络资源中的片断。例如一个网页中有多个名词解释,可使用fragment直接定位到某一名词解释。 # 四、curl命令参数详解: 由于linux curl功能十分强大,所以命令参数十分多,下表只筛选出来部分常用的参数,更多参数请运行“man curl”命令查看。 |参数|功能 | |:--|:--| | -a/--append | 上传文件时,附加到目标文件 -A/--user-agent <string> | 设置用户代理发送给服务器 -anyauth | 可以使用“任何”身份验证方法 -b/--cookie <name=string file=""> | cookie字符串或文件读取位置 --basic | 使用HTTP基本验证 -B/--use-ascii | 使用ASCII /文本传输 -c/--cookie-jar <file> | 操作结束后把cookie写入到这个文件中 -C/--continue-at <offset> | 断点续转 -d/--data <data> | HTTP POST方式传送数据 --data-ascii <data> | 以ascii的方式post数据 --data-binary <data> | 以二进制的方式post数据 --negotiate | 使用HTTP身份验证 --digest | 使用数字身份验证 --disable-eprt | 禁止使用EPRT或LPRT --disable-epsv | 禁止使用EPSV -D/--dump-header <file> | 把header信息写入到该文件中 --egd-file <file> | 为随机数据(SSL)设置EGD socket路径 --tcp-nodelay | 使用TCP_NODELAY选项 -e/--referer | 来源网址 -E/--cert <cert[:passwd]> | 客户端证书文件和密码 (SSL) --cert-type <type> | 证书文件类型 (DER/PEM/ENG) (SSL) --key <key> | 私钥文件名 (SSL) --key-type <type> | 私钥文件类型 (DER/PEM/ENG) (SSL) --pass <pass> | 私钥密码 (SSL) --engine <eng> | 加密引擎使用 (SSL). "--engine list" for list --cacert <file> | CA证书 (SSL) --capath <directory> | CA目录 (made using c_rehash) to verify peer against (SSL) --ciphers <list> | SSL密码 --compressed | 要求返回是压缩的形势 (using deflate or gzip) --connect-timeout <seconds> | 设置最大请求时间 --create-dirs | 建立本地目录的目录层次结构 --crlf | 上传是把LF转变成CRLF -f/--fail | 连接失败时不显示http错误 --ftp-create-dirs | 如果远程目录不存在,创建远程目录 --ftp-method [multicwd/nocwd/singlecwd] | 控制CWD的使用 --ftp-pasv | 使用 PASV/EPSV 代替端口 --ftp-skip-pasv-ip | 使用PASV的时候,忽略该IP地址 --ftp-ssl | 尝试用 SSL/TLS 来进行ftp数据传输 --ftp-ssl-reqd | 要求用 SSL/TLS 来进行ftp数据传输 -F/--form <name=content> | 模拟http表单提交数据 --form-string <name=string> | 模拟http表单提交数据 -g/--globoff | 禁用网址序列和范围使用{}和[] -G/--get | 以get的方式来发送数据 -H/--header <line> | 自定义头信息传递给服务器 --ignore-content-length | 忽略的HTTP头信息的长度 -i/--include | 输出时包括protocol头信息 -I/--head | 只显示请求头信息 -j/--junk-session-cookies | 读取文件进忽略session cookie --interface <interface> | 使用指定网络接口/地址 --krb4 <level> | 使用指定安全级别的krb4 -k/--insecure | 允许不使用证书到SSL站点 -K/--config | 指定的配置文件读取 -l/--list-only | 列出ftp目录下的文件名称 --limit-rate <rate> | 设置传输速度 --local-port<num> | 强制使用本地端口号 -m/--max-time <seconds> | 设置最大传输时间 --max-redirs <num> | 设置最大读取的目录数 --max-filesize <bytes> | 设置最大下载的文件总量 -M/--manual | 显示全手动 -n/--netrc | 从netrc文件中读取用户名和密码 --netrc-optional | 使用 .netrc 或者 URL来覆盖-n --ntlm | 使用 HTTP NTLM 身份验证 -N/--no-buffer | 禁用缓冲输出 -o/--output | 把输出写到该文件中 -O/--remote-name | 把输出写到该文件中,保留远程文件的文件名 -p/--proxytunnel | 使用HTTP代理 --proxy-anyauth | 选择任一代理身份验证方法 --proxy-basic | 在代理上使用基本身份验证 --proxy-digest | 在代理上使用数字身份验证 --proxy-ntlm | 在代理上使用ntlm身份验证 -P/--ftp-port <address> | 使用端口地址,而不是使用PASV -q | 作为第一个参数,关闭 .curlrc -Q/--quote <cmd> | 文件传输前,发送命令到服务器 -r/--range <range> | 检索来自HTTP/1.1或FTP服务器字节范围 --range-file | 读取(SSL)的随机文件 -R/--remote-time | 在本地生成文件时,保留远程文件时间 --retry <num> | 传输出现问题时,重试的次数 --retry-delay <seconds> | 传输出现问题时,设置重试间隔时间 --retry-max-time <seconds> | 传输出现问题时,设置最大重试时间 -s/--silent | 静默模式。不输出任何东西 -S/--show-error | 显示错误 --socks4 <host[:port]> | 用socks4代理给定主机和端口 --socks5 <host[:port]> | 用socks5代理给定主机和端口 --stderr <file> | -t/--telnet-option <opt=val> | Telnet选项设置 --trace <file> | 对指定文件进行debug --trace-ascii <file> | Like --跟踪但没有hex输出 --trace-time | 跟踪/详细输出时,添加时间戳 -T/--upload-file <file> | 上传文件 --url <url> | Spet URL to work with -u/--user <user[:password]> | 设置服务器的用户和密码 -U/--proxy-user <user[:password]> | 设置代理用户名和密码 -w/--write-out [format] | 什么输出完成后 -x/--proxy <host[:port]> | 在给定的端口上使用HTTP代理 -X/--request <command> | 指定什么命令 -y/--speed-time | 放弃限速所要的时间,默认为30 -Y/--speed-limit | 停止传输速度的限制,速度时间 # 五、Linux curl命令退出码: 下面是linux curl命令的错误代码和她们的相应的错误消息,命令执行错误的时候可以通过错误码来查看出错原因,方便开发调试。 |退 出 码 | 错误描述| |--|:--| |1 |Unsupported protocol. This build of curl has no support for this protocol.| |2 |Failed to initialize.| |3 |URL malformed. The syntax was not correct. |5 |Couldn't resolve proxy. The given proxy host could not be resolved. |6 |Couldn't resolve host. The given remote host was not resolved. |7 |Failed to connect to host. |8 |FTP weird server reply. The server sent data curl couldn't parse. |9 |FTP access denied. The server denied login or denied access to the particular resource or directory you wanted to reach. Most often you tried to change to a directory that doesn't exist on the server. |11 |FTP weird PASS reply. Curl couldn't parse the reply sent to the PASS request. |13 |FTP weird PASV reply, Curl couldn't parse the reply sent to the PASV request. |14 |FTP weird 227 format. Curl couldn't parse the 227-line the server sent. |15 |FTP can't get host. Couldn't resolve the host IP we got in the 227-line. |17 |FTP couldn't set binary. Couldn't change transfer method to binary. |18 |Partial file. Only a part of the file was transferred. |19 |FTP couldn't download/access the given file, the RETR (or similar) command failed. |21 |FTP quote error. A quote command returned error from the server. |22 |HTTP page not retrieved. The requested url was not found or returned another error with the HTTP error code being 400 or above. This return code only appears if -f/--fail is used. |23 |Write error. Curl couldn't write data to a local filesystem or similar. |25 |FTP couldn't STOR file. The server denied the STOR operation, used for FTP uploading. |26 |Read error. Various reading problems. |27 |Out of memory. A memory allocation request failed. |28 |Operation timeout. The specified time-out period was reached according to the conditions. |30 |FTP PORT failed. The PORT command failed. Not all FTP servers support the PORT command, try doing a transfer using PASV instead! |31 |FTP couldn't use REST. The REST command failed. This command is used for resumed FTP transfers. |33 |HTTP range error. The range "command" didn't work. |34 |HTTP post error. Internal post-request generation error. |35 |SSL connect error. The SSL handshaking failed. |36 |FTP bad download resume. Couldn't continue an earlier aborted download. |37 |FILE couldn't read file. Failed to open the file. Permissions? |38 |LDAP cannot bind. LDAP bind operation failed. |39 |LDAP search failed. |41 |Function not found. A required LDAP function was not found. |42 |Aborted by callback. An application told curl to abort the operation. |43 |Internal error. A function was called with a bad parameter. |45 |Interface error. A specified outgoing interface could not be used. |47 |Too many redirects. When following redirects, curl hit the maximum amount. |48 |Unknown TELNET option specified. |49 |Malformed telnet option. |51 |The peer's SSL certificate or SSH MD5 fingerprint was not ok. |52 |The server didn't reply anything, which here is considered an error. |53 |SSL crypto engine not found. |54 |Cannot set SSL crypto engine as default. |55 |Failed sending network data. |56 |Failure in receiving network data. |58 |Problem with the local certificate. |59 |Couldn't use specified SSL cipher. |60 |Peer certificate cannot be authenticated with known CA certificates. |61 |Unrecognized transfer encoding. 62 |Invalid LDAP URL. 63 |Maximum file size exceeded. 64 |Requested FTP SSL level failed. 65 |Sending the data requires a rewind that failed. 66 |Failed to initialize SSL Engine. 67 |The user name, password, or similar was not accepted and curl failed to log in. 68 |File not found on TFTP server. 69 |Permission problem on TFTP server. 70 |Out of disk space on TFTP server. 71 |Illegal TFTP operation. 72 |Unknown TFTP transfer ID. 73 |File already exists (TFTP). 74 |No such user (TFTP). 75 |Character conversion failed. 76 |Character conversion functions required. 77 |Problem with reading the SSL CA cert (path? access rights?). 78 |The resource referenced in the URL does not exist. 79 |An unspecified error occurred during the SSH session. 80 |Failed to shut down the SSL connection. 82 |Could not load CRL file, missing or wrong format (added in 7.19.0). 83 |Issuer check failed (added in 7.19.0). XX |More error codes will appear here in future releases. The existing ones are meant to never change. # 六、用法演示: 为节省篇幅,部分操作不再贴上执行结果。 ### 1、查看网页源码 直接在curl命令后加上网址,就可以看到网页源码。我们以网址www.sina.com为例(选择该网址,主要因为它的网页代码较短): ```bash root@ubuntu:/home/peng# curl www.sohu.com <title>307 Temporary Redirect</title> <center><h1>307 Temporary Redirect</h1></center> <hr><center>nginx</center> ``` 执行结果显示 `307 Temporary Redirect`,说明该网址需要重定向。 如果要把这个网页保存下来,可以使用`-o`参数,这就相当于使用wget命令了。 ```bash curl -o [文件名] www.sohu.com ``` ### 2、自动跳转 有的网址是自动跳转的。使用`-L`参数,curl就会跳转到新的网址。 ```bash curl -L www.sohu.com ``` 键入上面的命令,结果就自动跳转为www.sohu.com.cn。 ### 3、显示头信息 `-i`参数可以显示http response的头信息,连同网页代码一起。 ```bash root@ubuntu:/home/peng/driver/test# curl -i www.sohu.com HTTP/1.1 307 Temporary Redirect Content-Type: text/html Content-Length: 180 Connection: keep-alive Server: nginx Date: Tue, 25 Aug 2020 10:10:54 GMT Location: https://www.sohu.com/ FSS-Cache: from 9790436.18244590.10468709 FSS-Proxy: Powered by 2384755.3433341.3062915 <title>307 Temporary Redirect</title> <center><h1>307 Temporary Redirect</h1></center> <hr><center>nginx</center> ``` `-I`参数则是只显示http response的头信息。 ### 4、显示通信过程 `-v`参数可以显示一次http通信的整个过程,包括端口连接和http request头信息。 ```bash root@ubuntu:/home/peng/driver/test# curl -v www.sohu.com * About to connect() to www.sohu.com port 80 (#0) * Trying 240e:83:201:3700::5... connected > GET / HTTP/1.1 > User-Agent: curl/7.22.0 (i686-pc-linux-gnu) libcurl/7.22.0 OpenSSL/1.0.1 zlib/1.2.3.4 libidn/1.23 librtmp/2.3 > Host: www.sohu.com > Accept: */@@* > < HTTP/1.1 307 Temporary Redirect < Content-Type: text/html < Content-Length: 180 < Connection: keep-alive < Server: nginx < Date: Tue, 25 Aug 2020 10:11:49 GMT < Location: https://www.sohu.com/ < FSS-Cache: from 9855973.18375663.10534247 < FSS-Proxy: Powered by 2450292.3564414.3128453 < <title>307 Temporary Redirect</title> <center><h1>307 Temporary Redirect</h1></center> <hr><center>nginx</center> * Connection #0 to host www.sohu.com left intact * Closing connection #0 ``` 如果你觉得上面的信息还不够,那么下面的命令可以查看更详细的通信过程。 ```bash curl --trace output.txt www.sohu.com ``` 或者 ```bash curl --trace-ascii output.txt www.sohu.com ``` 运行后,请打开output.txt文件查看。 ### 5、发送表单信息 发送表单信息有GET和POST两种方法。GET方法相对简单,只要把数据附在网址后面就行。 ```bash curl example.com/form.cgi?data=xxx ``` POST方法必须把数据和网址分开,curl就要用到--data参数。 ```bash curl -X POST --data "data=xxx" example.com/form.cgi ``` 如果你的数据没有经过表单编码,还可以让curl为你编码,参数是`--data-urlencode`。 ```bash curl -X POST--data-urlencode "date=April 1" example.com/form.cgi ``` ### 6、HTTP动词 curl默认的HTTP动词是GET,使用`-X`参数可以支持其他动词。 ```bash curl -X POST www.example.com curl -X DELETE www.example.com ``` ### 7、文件上传 假定文件上传的表单是下面这样: ```bash <form method="POST" enctype="multipart/form-data" action="upload.cgi"> <input type="file" name="upload"> <input type="submit" name="press" value="OK"> </form> ``` 你可以用curl这样上传文件: ```bash curl --form upload=@localfilename --form press=OK [URL] ``` ### 8、Referer字段 有时你需要在http request头信息中,提供一个referer字段,表示你是从哪里跳转过来的。 ```bash curl --referer http://www.example.com http://www.example.com ``` ### 9、User Agent字段 这个字段是用来表示客户端的设备信息。服务器有时会根据这个字段,针对不同设备,返回不同格式的网页,比如手机版和桌面版。 iPhone4的User Agent是 ```bash Mozilla/5.0 (iPhone; U; CPU iPhone OS 4_0 like Mac OS X; en-us) AppleWebKit/532.9 (KHTML, like Gecko) Version/4.0.5 Mobile/8A293 Safari/6531.22.7 ``` curl可以这样模拟: ```bash curl --user-agent "[User Agent]" [URL] ``` ### 10、cookie 使用`--cookie`参数,可以让curl发送cookie。 ```bash curl --cookie "name=xxx" www.example.com ``` 至于具体的cookie的值,可以从http response头信息的`Set-Cookie`字段中得到。 `-c cookie-file`可以保存服务器返回的cookie到文件,`-b cookie-file`可以使用这个文件作为cookie信息,进行后续的请求。 ```bash curl -c cookies http://example.com curl -b cookies http://example.com ``` ### 11、增加头信息 有时需要在http request之中,自行增加一个头信息。`--header`参数就可以起到这个作用。 ```bash $ curl --header "Content-Type:application/json" http://example.com ``` ### 12、认证 使用curl选项 -u 可以完成HTTP或者FTP的认证,可以指定密码,也可以不指定密码在后续操作中输入密码: ```bash curl -u user:pwd http://man.linuxde.net curl -u user http://man.linuxde.net ``` ### 13、FTP #### 1)、列出ftp服务器上的目录列表 ```bash curl ftp://www.xxx.com/ --user name:passwd curl ftp://www.xxx.com/ –u name:passwd #简洁写法 curl ftp://name:passwd@www.xxx.com #简洁写法2 ``` 例如:在IP地址192.168.43.117上搭建FTP服务器,并设置用户名为`user`,密码为`123456` 现在我们要显示服务器上根目录下的所有文件信息,命令如下: ```bash curl -u user:123456 ftp://192.168.43.117 ``` 执行结果如下:  **简洁写法:** ```bash curl ftp://user:123456@192.168.43.117 ``` 执行结果如下:  #### 2)、只列出目录,不显示进度条 ```bash curl ftp://www.xxx.com –u name:passwd -s ``` #### 3)、下载一个文件: **格式** ```bash curl ftp://www.xxx.com/size.zip –u name:passwd -o size.zip ``` 示例如下: 从服务器的根目录下下载文件test.c,保存到本地,本地文件名也为test.c。 【注意】如果没有-o选项,程序会吧数据流定向到stdout,即直接把文件内容显示到终端上。 ```bash curl ftp://user:123456@192.168.43.117/test.c -o test.c ``` 执行结果如下:  **简洁模式** ```bash curl -u user:123456 ftp://192.168.43.117/list.h -o list.h ``` 执行结果如下:  #### 4)、上载一个文件: ```bash curl –u name:passwd -T size.mp3 ftp://www.xxx.com/mp3/ ``` 举例如下: ```bash curl -u user:123456 ftp://192.168.43.117/ -T list.h ```  可以看到文件并没有上传成功,返回错误码是25,参考第五章 ```bash 25 FTP couldn't STOR file. The server denied the STOR operation, used for FTP uploading. ``` 可知,是因为服务器没有赋予存储的权限,所以设置服务器的write权限即可。  #### 5)、从服务器上删除文件(使用curl传递ftp协议的DELE命令): ```bash curl –u name:passwd ftp://www.xxx.com/ -X 'DELE mp3/size.mp3' ``` #### 6)、另外curl不支持递归下载,不过可以用数组方式下载文件,比如我们要下载1-10.gif连续命名的文件:** ```bash curl –u name:passwd ftp://www.xxx.com/img/[1-10].gif –O #O字母大写 ``` #### 7)、要连续下载多个文件: ```bash curl –u name:passwd ftp://www.xxx.com/img/[one,two,three].jpg –O #O字母大写 ``` # 六、实现日志文件定时上传 ## 功能 1. 程序运行时要记录当前日志文件的最后修改时间; 2. 每个10秒钟就检查下log文件是否被修改,如果没有被修改就休眠10秒钟; 3. 如果log文件被修改了,就将当前的日志文件拷贝成备份文件,备份文件名字加上当前时间; 4. 通过curl发送给ftp服务器; 5. 删除备份文件,重复步骤2。 ### 程序流程图如下: 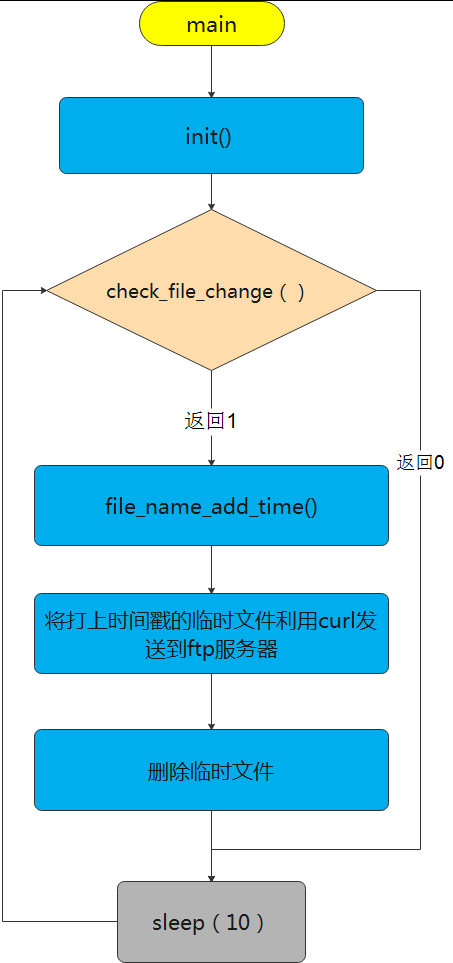 ### 函数功能介绍 #### init() 首先记录当前log文件时间,并记录到全局变量`last_mtime`中。 #### check_file_change() 读取文件最后修改时间,并和`last_mtime`进行比较,如果相同就返回0,不同就返回1. #### file_name_add_time() 将当前的日志文件拷贝成备份文件,备份文件名字加上当前时间。 #### stat() 得到对应文件的属性信息,存放到struct stat结构体变量中。 #### system() 执行参数中字符串对应的命令 ### 代码如下: ```c /@@* Copyright (C) 公众号: yikoulinux */ #include <sys stat.h=""> #include <stdio.h> #include <stdlib.h> #include <unistd.h> #include <time.h> typedef struct stat ST; unsigned long last_mtime; /@@*用户名密码暂时写死,实际应该保存在配置文件*/ char name[32]="user"; char pass[32] ="123456"; char ip[32] ="192.168.43.117"; char filename[32]="t.log"; char dstfile[256] ={0}; int init(void) { //准备结构体 ST status; //调用stat函数 int res = stat(filename,&status); if(-1 == res) { perror("error:open file fail\n"); return 0; } last_mtime = status.st_mtime; printf("init time:%s \n",ctime(&last_mtime)); return 1; } int check_file_change(void) { //准备结构体 ST status; //调用stat函数 int res = stat(filename,&status); if(-1 == res) { perror("error:open file fail\n"); return 0; } // printf("old:%s new:%s",ctime(&last_mtime),ctime(&status.st_mtime)); if(last_mtime == status.st_mtime) { printf("file not change\n"); return 0; }else{ printf("file updated\n"); last_mtime = status.st_mtime; return 1; } } void file_name_add_time(void) { ST status; time_t t; struct tm *tblock; char cmd[1024]={0}; t = time(NULL); tblock = localtime(&t); sprintf(dstfile,"t-%d-%d-%d-%d-%d-%d.log", tblock->tm_year+1900, tblock->tm_mon, tblock->tm_mday, tblock->tm_hour, tblock->tm_min, tblock->tm_sec); sprintf(cmd,"cp %s %s",filename,dstfile); // printf("cdm=%s\n",cmd); system(cmd); } int main(void) { char cmd[1024]={0}; init(); while(1) { if(check_file_change() == 1) { file_name_add_time(); sprintf(cmd,"curl -u %s:%s ftp://%s/ -T %s",name,pass,ip,dstfile); // printf("cdm=%s\n",cmd); system(cmd); unlink(dstfile); } sl<ickey>eep(10); } } ``` #### 运行截图: **第一步:**  因为log文件没有被修改过,所以程序不会上传。 **第二步:** 手动输入字符串 yikoulinux 到日志文件 t.log中。 第三步: 因为文件发生了改变,所以打印“file updated”,同时可以看到curl上传文件的log信息。 以下是FTP服务器的根目录,可以看到,上传的日志文件:`t-2020-7-26-1-19-45.log`。 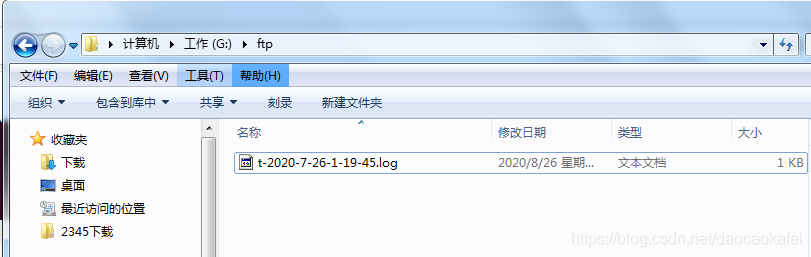 ## 【补充】 1. 配置信息,直接在代码中写死,通常应该从配置文件中读取,为方便读者阅读,本代码没有增加该功能; 2. FTP服务器搭建,本文没有说明,相关文件比较多,大家可以自行搜索,一口君用的是File zilla;  3. 通常这种需要长时间运行的程序,需要设置成守护进程,本文没有添加相应功能,读者可以自行搜索。如果强烈要求可以单开一篇详细介绍。 4. 代码中time的管理函数,请读者自行搜索相关文章。 5. curl也提供了相关的函数库curl.lib,如果要实现更灵活的功能可以使用对应的api。 6. 之所以先把文件拷贝成备份文件,主要是考虑其他模块随时可能修改日志文件,起到一定保护作用。</ickey></time.h></unistd.h></stdlib.h></stdio.h></sys></command></host[:port]></user[:password]></user[:password]></url></file></file></file></opt=val></file></host[:port]></host[:port]></seconds></seconds></num></range></cmd></address></bytes></num></seconds></num></rate></level></interface></line></name=string></name=content></seconds></list></directory></file></eng></pass></type></key></type></cert[:passwd]></file></file></data></data></data></offset></file></name=string></string>
原创作品,未经权利人授权禁止转载。详情见
转载须知
。
举报文章
点赞
(
0
)
一口Linux
关注
评论
(0)
登录后可评论,请
登录
或
注册
相关文章推荐
MK-米客方德推出工业级存储卡
Beetle ESP32 C3 蓝牙数据收发
Beetle ESP32 C3 wifi联网获取实时天气信息
开箱测评Beetle ESP32-C3 (RISC-V芯片)模块
正点原子数控电源DP100测评
DP100试用评测-----开箱+初体验
Beetle ESP32 C3环境搭建
【花雕体验】16 使用Beetle ESP32 C3控制8X32位WS2812硬屏之二
X
你的打赏是对原创作者最大的认可
请选择打赏IC币的数量,一经提交无法退回 !
100IC币
500IC币
1000IC币
自定义
IC币
确定
X
提交成功 ! 谢谢您的支持
返回
我要举报该内容理由
×
广告及垃圾信息
抄袭或未经授权
其它举报理由
请输入您举报的理由(50字以内)
取消
提交